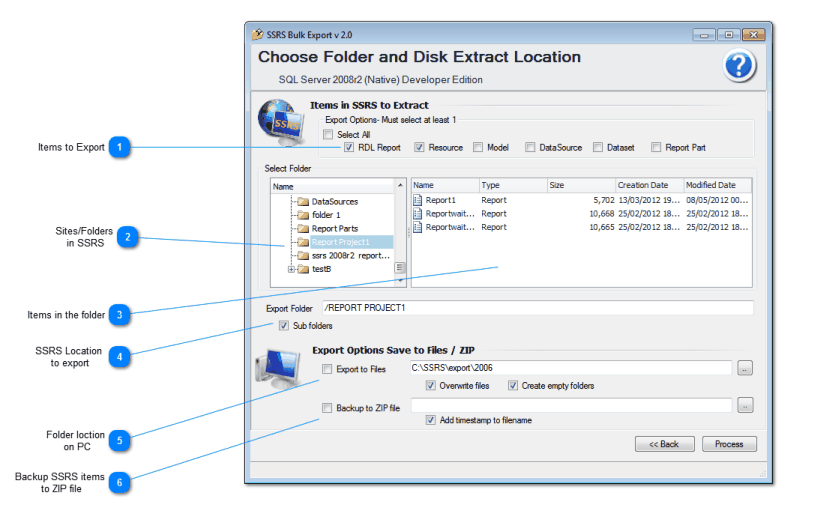
This screen is used to choose the input and output locations.The SQL Detected version is displayed in the header.

Item |
Description |
1 |
select item types to extract from SSRS Server |
2 |
Folders on the SSRS Server showing in a treeview. Select where you want the export to occur. |
3 |
Items in the folder. |
4 |
The selected location where there export on the SSRS server will start. Optionally you can include sub folders |
5 |
Export options. This will export the selected items in (1) to the folder location defined here. |
6 |
Export option. This saves the items in a zip file. The folder structure is maintained in the zip file. Optionally you can add a timestamp to the zip file. |
Notes
In Integrated Mode the site name may be in the format http://<server>/<folder>, this would cause issues in saving as / : are invalid characters in folder names.
To resolve this, SSRS Bulk Extract will remove : and replace // with #
eg. Site called http://dev/SalesDocs will be transformed to http##dev#SalesDocs
Export to Files ( 5)
There are also 2 check box options:
Overwrite files- If there is an existing file on your disk with the same name as a file to be exported, SSRS Bulk Export can overwrite the file.
If Overwrite files is not selected, only items not already on your disk will export. Use this function to export only new reports.
Create Empty Folders. Selecting this option will create folder with no items in folder. The folder will be created if there are sub folders but no files.
Now you are ready to hit the Process button. This begins a validation process, and you will see another window summarizing all this information Confirm Summary Information
Make sure you have connected to the correct server, and the account information is correct. Press the back button to make any changes. RDL Export from SSRS Server to Disk
